Many of the swap stoppers and flute crowns sold on this site contain small but strong magnets. Products to which this applies contain links to this document on their product details page.
The crowns can be used without magnets as they are only used on the additional weights. They are separate. If you want to order a product without magnets in the delivery box, please let us know and we will omit them.
The fun coloured crowns for children do not contain magnets.
Please read the following before handling these products.
Magnets are more powerful than you might imagine. The must be handled with care. Before handling, please follow these safety instructions
Here is a quick video showing how to install one of my flute crowns to your headjoint.
To fit it, you basically:
Headjoints taper/narrow from the embouchure hole to the crown end of the tube. I wanted to make my crowns re-usable and adaptable to many headjoints - you might own multiple headjonts or wish to transfer your crown to a new headjoint later. To facilitate this I created a means to adjust the fit.
The base of each crown includes two slots for the o-rings: a bottom (wider) and top (narrower) slot; and 3 o-rings of small, medium, and large diameter.
For many headjoints, the medium o-ring in the bottom slot works best. When you order your crown, I will ask you for the internal measurement of the tube at the crown end, and fit the correct o-ring into the appropriate slot. But if you can't measure it, I will usually send them out with the medium o-ring in the bottom slot (unless I happen to have a similar headjoint around or existing measurements).
If you need/want a tighter fit you can replace the medium o-ring with the large one in the bottom slot. If you want a looser fit, you can either move the medium o-ring to the top slot or swap it for the small o-ring in the bottom or top slots. Very few headjoints narrow so much that you will need to fit the smallest o-ring into the top slot - but some do!
You might also like to experiment with the tightness of the fitting, and even with using multiple o-rings at once, for example, the large in the top slot, and the medium in the bottom. Many people find that these changes alter the "feel" of the headjoint.
...for the poor video quality. I'll make a better one soon :)
]]>
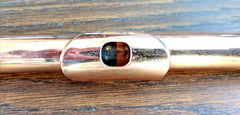
Polished flute crowns, such as those in silver and bronze, are a joy to own. As with any jewellery item, you need to consider how best to look after them.
Handle them just like any other item of precious jewellery and with the same care you would the rest of your flute. I've put a lot of effort into making the best item that I can, and preparing it with care. You will receive it in the optimum condition and level of polish that I can produce and it is natural that, over time, your handling of it in everyday use will add tiny scratches and blemishes.
Over time, some metals such as silver and bronze will naturally tarnish and loose a little of their glossy shine. I personally enjoy the slowly changing hue of bronze, but if you like you can keep them shiny as new.
Alternatively, and for a professional finish, ask your flute repair shop to buff the crown when you get your next COA/Service. It will only take them a few seconds using the professional equipment in their workshop, and they are likely going to clean/buff other parts of your flute already.
Unfortunately, accidents happen. If you drop it, you may sadly scratch your flute crown depending on what kind of the surface it lands on.
Make sure that the crown is a firm fit into the headjoint, so that it does not fall out in normal use. It should not move/fall when the headjoint is turned upside down for example.
Jewellers, and your local flute repair shop, can usually remove scratches and re-polish for you very quickly. This is usually only easy if the item is unplated. Gold and rhodium plated crows, if deeply scratched, take a lot more work to restore.
Gold/Rhodium plated flute crowns will barely tarnish over time, though if you handle them roughly or regularly for many years, you may rub through the plating. This is less likely with flute crowns than most jewellery, as you won't normally handle your flute crown every day.
If you do scratch through or rub off the plating is it not necessarily a big problem. Most jewellers will be able to restore the item for you, and you might find you have a plating company nearby who can add a plating of your choice. If in doubt, you are always welcome to contact me and I can help find the best solution.
]]>We are going to replace the traditional cork stopper in this modern wood headjoint with a new swap-stopper.
Here is a picture of the kit in its current carrying case, including stopper back, removal tool, three faces (silver, titanium, zirconium - with protective films on), weights, and cleaning cloth:
First I will push out the old cork, using the tool provided. The tool has two ends, one covered end for extracting the stopper faces... ...and one open end which is used to position the stopper and insert new faces.
So, I'll use the open end to push out the old cork. Because it's open, it can slide over the screw thread. And out it comes. Luckily that didn't need much pressure. You should only remove your own cork if you know what you are doing.
Now I'll install the replacement stopper "Back". It has two sides, one with a magnet, and one with a little hole. We want the little hole to face into the flute, toward the embouchure.
Put the stopper back, magnet facing up, on the open end of the tool. And lower the headjoint, tenon first down onto it. Push it gently but firmly past the embouchure. It should be a snug/tight fit but not require extreme force.
To find its correct position, we need to use the mark your headjoint maker placed on the cleaning rod. As we have not installed the "Face" yet, you want to push the "back" a little past where you'd normally set the stopper.
Then, we'll choose a face. I'm going with zirconium.
You are going to place it magnet facing up (metal facing down) onto the open end of the tool - and like before, lower the headjoint over it. You will likely hear a click sound, as the face connects with the back.
Now we fine tune the position. You are going to push the stopper back or forth according to the mark on your cleaning rod. Each headjoint and each manufacturer will have their preferred position. You are going to position this in the same place you would a traditional cork. It may take three of four minor adjustments till you are satisfied. But you only have to do this once. Swapping faces in the future will not require position adjustment.
Now, to demonstrate how easy it is to change a face from now on. This time, use the tool with the covered end upward and insert into the headjoint. Push it gently till it nearly meets the stopper - and the stopper face should attach itself to the tool. Then simply pull out. Swap to another face. And again, put it magnet up, face down, onto the open end of the tool. And insert into the headjoint as before. Click. Done.